It is important to know how to format an external hard drive on Windows 10 to ensure it is properly set up and ready to use. Formatting an external hard drive is not as difficult as it may seem, and this tutorial will walk you through the steps to properly format an external hard drive on Windows 10.
- Connect the external hard drive to the computer.
- Open File Explorer.
- Click on the Start menu.
- Select File Explorer from the list of apps.
- Right-click on the external hard drive in File Explorer.
- Select Format from the menu.
- Choose the file system for the external hard drive.
- NTFS is recommended for most external hard drives.
- FAT32 is recommended for drives that need to be used with some older Windows versions.
- exFAT is recommended for flash drives.
- Click Start to begin the formatting process.
- Wait for the formatting process to be completed.
- Click OK to finish formatting the external hard drive.
How Do I Completely Format An External Hard Drive?
Formatting an external hard drive is a relatively straightforward process that allows you to completely erase the data and partitions on the drive. As a result, it can be used for a variety of purposes, such as storing new files or creating a backup.
To format an external hard drive, you must first connect the drive to your computer. If it is a USB drive, you can simply plug it into an open USB port. Alternatively, you can use an adapter to connect it to a SATA port. Once connected, you can access the drive through the operating system’s file manager.
Next, you will need to open the disk management utility. This is typically located in the Control Panel, but it can also be accessed through the command line. Once open, you will be able to view the connected drives. Select the external drive, right click and choose the format option. From here, you can configure the settings for the drive, including the file system and the allocation unit size. When finished, click OK to start the formatting process. The time required to format the drive will depend on the size of the drive.
Once the drive has been formatted, you can begin using it to store files or create a backup. It is important to remember that all data on the external drive will be lost during the formatting process. Therefore, you should be sure to back up any important data before formatting the drive.
Why Can’t I Format My External Hard Drive?
External hard drives, like other forms of storage, must be formatted before they can be used. If you are having trouble formatting your external hard drive, it could be due to a few different factors.
First, you may not have the correct software required to format your device. Typically, you can download the software from the manufacturer’s website. Once you have the correct software, connect your external hard drive to your computer, and then use the software to format the drive.
Another reason you could be having trouble formatting your external hard drive is if it is not compatible with your computer. Before purchasing an external hard drive, make sure that it is compatible with your system. Check the manufacturer’s website for the specifications of the device to make sure it will work with your computer.
It is also possible that the external hard drive is damaged or corrupted. If this is the case, you will need to attempt to repair the drive or replace it. If you are able to repair the drive, you should be able to format it. However, if the drive is too damaged, you may not be able to format it.
How Do I Format My External Hard Drive Windows 10 Not Visible?
Formatting an external hard drive on Windows 10 is a simple process that can be completed in a few steps. Before proceeding, make sure to back up any important data stored on the drive as the formatting process will erase all the data.
To format an external hard drive on Windows 10, follow these steps:
- Connect the external hard drive to a USB port on your computer.
- Go to “This PC” in the file explorer.
- Right-click on the external drive and select “Format”.
- Choose the file system and allocation unit size.
- Give the drive a name and click “Start”.
- Click “Ok” to start formatting the drive.
Once the formatting process is complete, the external hard drive will be ready to use. Make sure to always pay attention to the file system and allocation unit size when formatting an external hard drive as different devices may require different settings.
Should I Format My External Hard Drive To NTFS Or ExFat?
Formatting an external hard drive is an important step in ensuring the security and usability of your data. Depending on the operating system you are using and the type of data you are storing, you may need to choose between NTFS or ExFAT as your file system.
NTFS (New Technology File System) is the Windows default file system and is the most compatible with Windows operating systems. It is an excellent option for storing large files such as videos, games, and other large documents. NTFS also allows you to set up permissions, which is a great way to keep your data secure.
ExFAT (Extended File Allocation Table) is a less secure, but more flexible file system. It is suitable for use in situations where you need to exchange large files between different operating systems, such as Mac and Windows. It has less security features, but it also does not have the same size limitations as NTFS.
When deciding which file system to use for your external hard drive, consider the type of data you are storing and the operating system you are using. NTFS is the best option if you are using a Windows operating system and need to store large files, while ExFAT is the best option for exchanging large files across different operating systems.
Format External Hard Drive Windows 10 Not Showing Up
If your external hard drive is not showing up in Windows 10 computer, it needs to be formatted. Formatting an external hard drive is not complicated and can be done in a few simple steps.
- Connect your external hard drive to your Windows 10 computer
- Open the File Explorer and locate the external hard drive
- Right-click on the external hard drive and select “Format”
- Choose the file system you want to format the hard drive to
- Enter a name for the hard drive in the Volume label field
- Check the Quick Format box and click Start
- Wait for the formatting process to finish and then click OK
- Your external hard drive is now formatted and ready to use
When formatting an external hard drive, you can choose between the NTFS, FAT32, or exFAT file system. NTFS is the most common file system and is best for most situations. FAT32 is an older file system and is good for removable drives and drives that are used to interchange data between Windows and other operating systems. exFAT is the latest file system and is used for large external hard drives. It is also good for removable drives and drives that are used to interchange data between Windows and other operating systems.
How To Format An External Hard Drive That Is Not Visible
If you are looking to format an external hard drive in Windows 10 that is not visible, there are a few steps you must take to ensure a successful reformat. In the following steps, we will explore formatting an external hard drive that is not visible in Windows 10.
- Connect your external hard drive to your computer, and power it on.
- Open the disk management tool by pressing the Windows key + R, and typing “diskmgmt.msc”, then pressing Enter.
- Look for your external hard drive in the list of available disks. It may be labeled as “Unknown”, or “Not Initialized”.
- Right click on the disk, and select Initialize Disk.
- Choose which partition style you would like to use. If you are not sure, you can select MBR (Master Boot Record) for drives up to 2TB, or GPT (GUID Partition Table) for drives larger than 2TB.
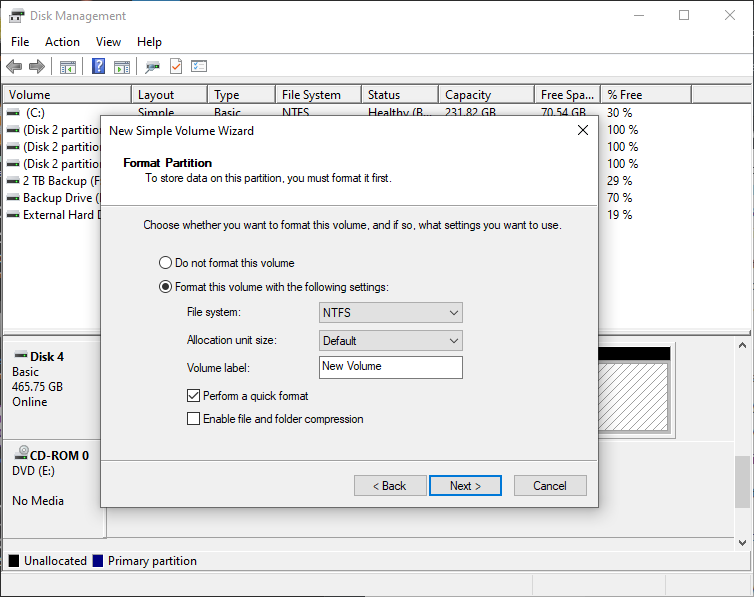
- Once the drive has been initialized, you will see the disk in the list of available disks. Right click on the disk, and select New Simple Volume.
- The New Simple Volume Wizard will open. Follow the prompts to complete the setup of your external hard drive.
- Once the setup is complete, the drive will be visible in both the disk management tool, and in the file explorer.
Once the drive has been initialized and set up, you will be able to store and access data on the drive. If you experience any issues during the setup process, you can refer to the help resources provided by the manufacturer of your external hard drive.
Format External Hard Drive Windows 11
When it comes to formatting an external hard drive on Windows 10, the process is relatively easy. Before you begin, make sure you have backed up all your data as the formatting process will erase any existing files or folders.
To format the external hard drive, follow the steps below:
- Connect the external hard drive to a USB port on your computer.
- Open File Explorer, and locate the external hard drive in the list of available drives.
- Right-click on the external hard drive, and select “Format”.
- In the Format window, select the File System you want to use for the external hard drive. Windows 10 supports FAT32, exFAT, and NTFS.
- Select the “Quick Format” option and click the “Start” button.
- Wait for the formatting process to finish.
- Once the formatting is completed, click the “OK” button to close the Format window.
Once the formatting is completed, your external hard drive is ready to be used. Keep in mind that you will need to format the drive with the same file system as the operating system you are using. For example, if you are using Windows 10, you will need to format the external hard drive with the NTFS file system.
Reformat External Hard Drive Mac
Reformatting an external hard drive on macOS is a relatively straightforward task, but it is important to make sure you understand the different steps involved before beginning.
In order to reformat an external hard drive, you will need to open the “Disk Utility” application, located in the “Applications” folder. Once the application is open, select the external drive which you wish to reformat in the list of drives on the left-hand side of the window. After selecting the drive, click the “Erase” button at the top of the window. This will display the “Format” drop-down menu where you can select the file system you wish to use for the drive. Common file systems for macOS are “Mac OS Extended (Journaled)”, “Mac OS Extended”, “exFAT”, and “MS-DOS (FAT)”. After selecting the file system, enter a name for the drive and click the “Erase” button. This will begin the reformatting process. When the process is complete, the drive will be ready to use.
It is important to note that reformatting a drive will erase all data on the drive so make sure to back up any important files before reformatting. Furthermore, if the drive is used in other operating systems such as Windows, you may need to reformat the drive using a different file system such as “exFAT” or “MS-DOS (FAT)” in order to ensure compatibility.
How To Format External Hard Drive Windows 10 Cmd
Formatting an external hard drive in Windows 10 is a relatively straightforward process. To begin, you need to connect the external hard drive to your Windows 10 computer via a USB cable if it is not already connected. After your computer has recognized the external hard drive, open the File Explorer window.
Once in the File Explorer window, you will be able to select the external hard drive from the left pane. Right-click on the external hard drive and select the “Format” option. A new window will open, allowing you to select the file system and the allocation size. The file system you choose will depend on your operating system, but if you are using Windows 10, the most suitable option will be NTFS.
Once you have selected the file system and the allocation size, click the “Start” button. A warning prompt will appear, asking you to confirm the formatting of the drive. Click the “OK” button to confirm the formatting process. After a few moments, the formatting of the external hard drive will be complete.
How To Format A Hard Drive With Windows On It
Formatting an external hard drive can be a quick and easy task if you have the right tools and know the correct steps. To format an external hard drive in Windows 10, you must have administrative privileges and connect the drive to your computer via a compatible USB port.
Steps:
- Open “This PC” from the Start Menu
- Locate and right-click the drive you want to format
- Select “Format” from the context menu
- Enter a Volume Label (Name) for the drive
- Choose a File system from the drop-down menu
- Select the option to Perform a Quick Format
- Click the Start button to begin formatting
- Click OK when the process is complete
It’s important to note that formatting a drive will erase all the data on it, so make sure you have a backup of any important documents or files before formatting. The file system you choose will depend on what type of files you want to store on the drive. FAT32 is the most compatible, but it has a 4GB file size limit. NTFS is a newer system that has no file size limit, but is not as compatible with older operating systems. You can also choose exFAT which is a good balance between the two.
How To Format External Hard Drive Windows 7
Formatting an external hard drive on Windows 10 is a relatively easy task that can be completed in minutes. To get started, you will need an external hard drive and a PC running Windows 10.
First, connect your external hard drive to the PC. Once the external hard drive is connected, open the “File Explorer” on your PC. The File Explorer can be found in the Start menu or by pressing the Windows and E keys on your keyboard.
Once the File Explorer window is open, locate and select your external hard drive from the list of available drives. Right click on the external hard drive and select the “Format” option from the menu. This will open the Format window for the external hard drive.
In the Format window, select the file system you would like to use from the drop-down list. The most common file systems are NTFS and exFAT. Once you have selected the file system, you can enter a name for the drive in the “Volume Label” field. You can also check the “Quick Format” box if you want the drive to be formatted quickly. When you are finished, click the “Start” button to begin formatting your external hard drive.
Once the formatting process is complete, the external hard drive will be ready to use. You can now store data on the drive or use it to back up your files.
How To Format A Hard Drive Windows 10 From Bios
Formatting a hard drive in Windows 10 from BIOS is a very simple process. Before you can format the hard drive, you will need to enter BIOS by pressing the power button and then press the appropriate key for your system to enter the BIOS setup. Once you have entered BIOS, select the Boot tab and then select your hard drive as the first boot device.
After you have selected the hard drive, press the F10 key to save the settings and then exit the BIOS setup. The system will restart and boot from the hard drive. Once the system has finished booting, you will need to open the Disk Management tool by pressing the Windows key and typing “Disk Management”. The Disk Management window will open and you will see your hard drive listed.
Right-click on the hard drive and select “Format”. A new window will open with the options to format the hard drive. Select the format type, file system and size of the partition, then click “OK” to start the formatting process. The process may take a few minutes depending on the size of the hard drive. When the formatting process is finished, the hard drive will be ready to use.
2021-2022 APPROVED!!! | HOW TO FIND AND FORMAT EXTERNAL HARD DRIVES TO NTFS AND exFAT | PC | Xbox
Formatting an external hard drive is a great way to keep your data safe and secure. It’s an easy process for Windows 10 users, and the steps outlined in this article will help you get the job done quickly and easily. With just a few clicks of the mouse, you can have your external hard drive formatted and ready to use. The process is quick and easy, and you’ll be glad you took the time to get it done. Taking the time to format your external hard drive is a great way to ensure that your data is safe and secure.